
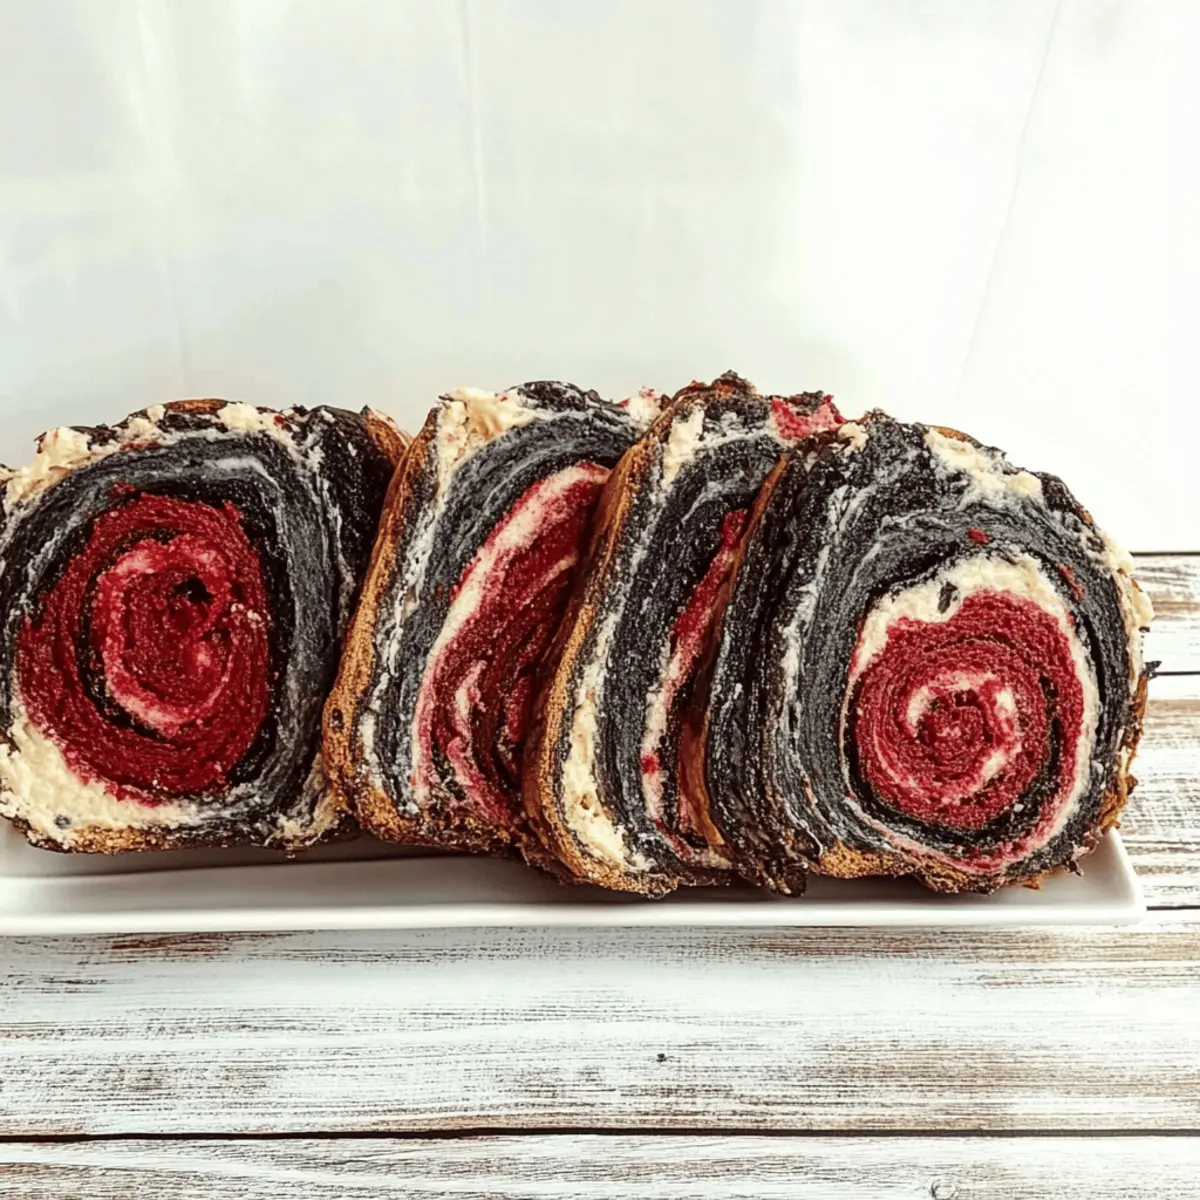
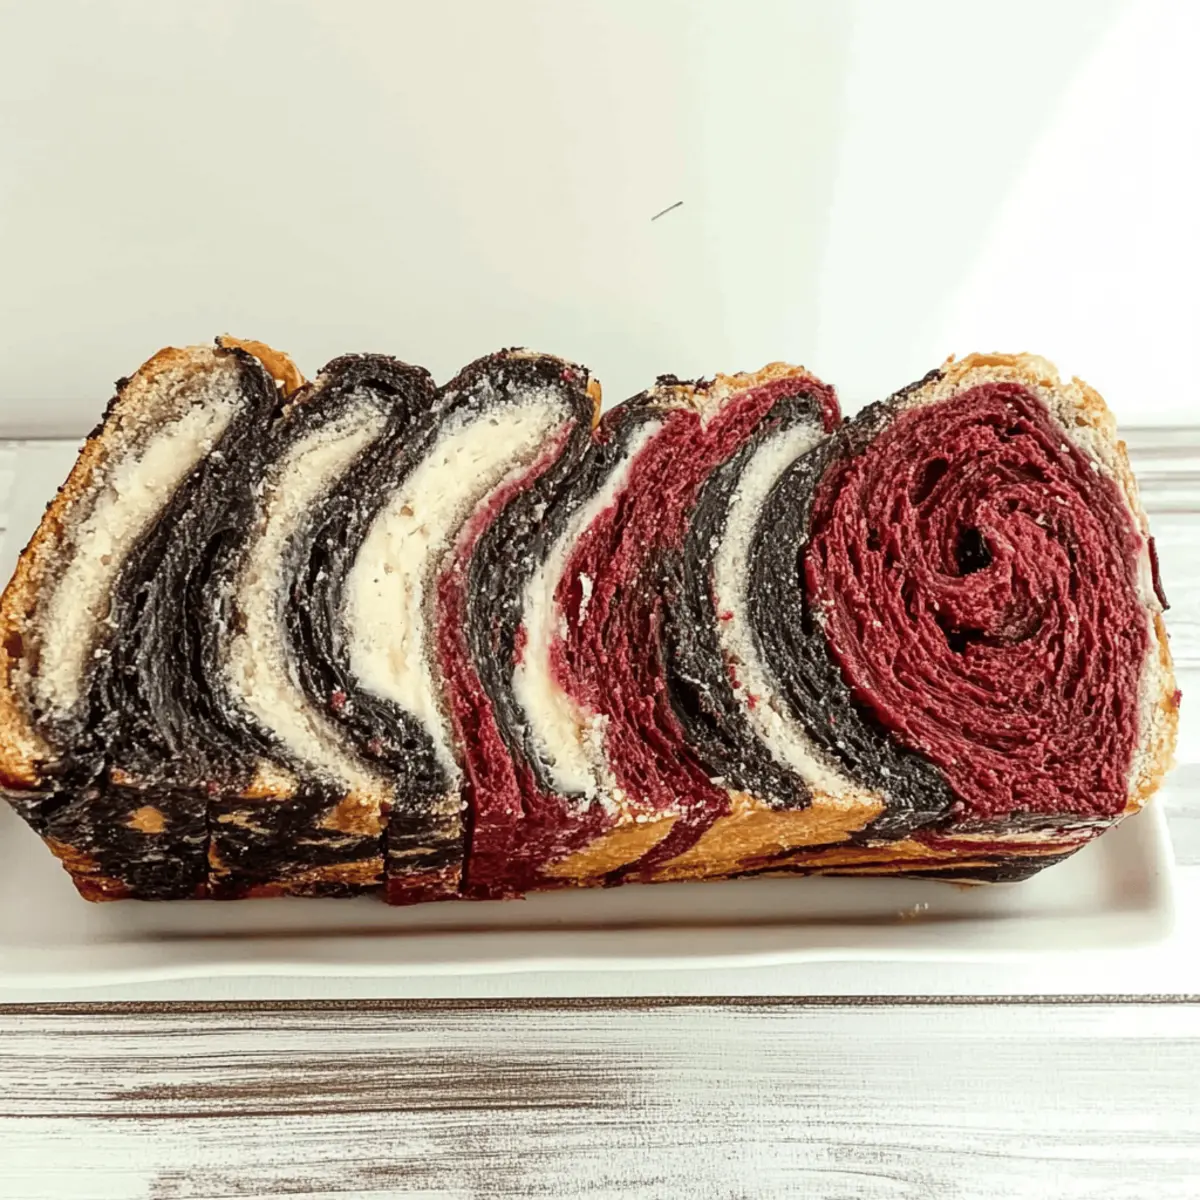
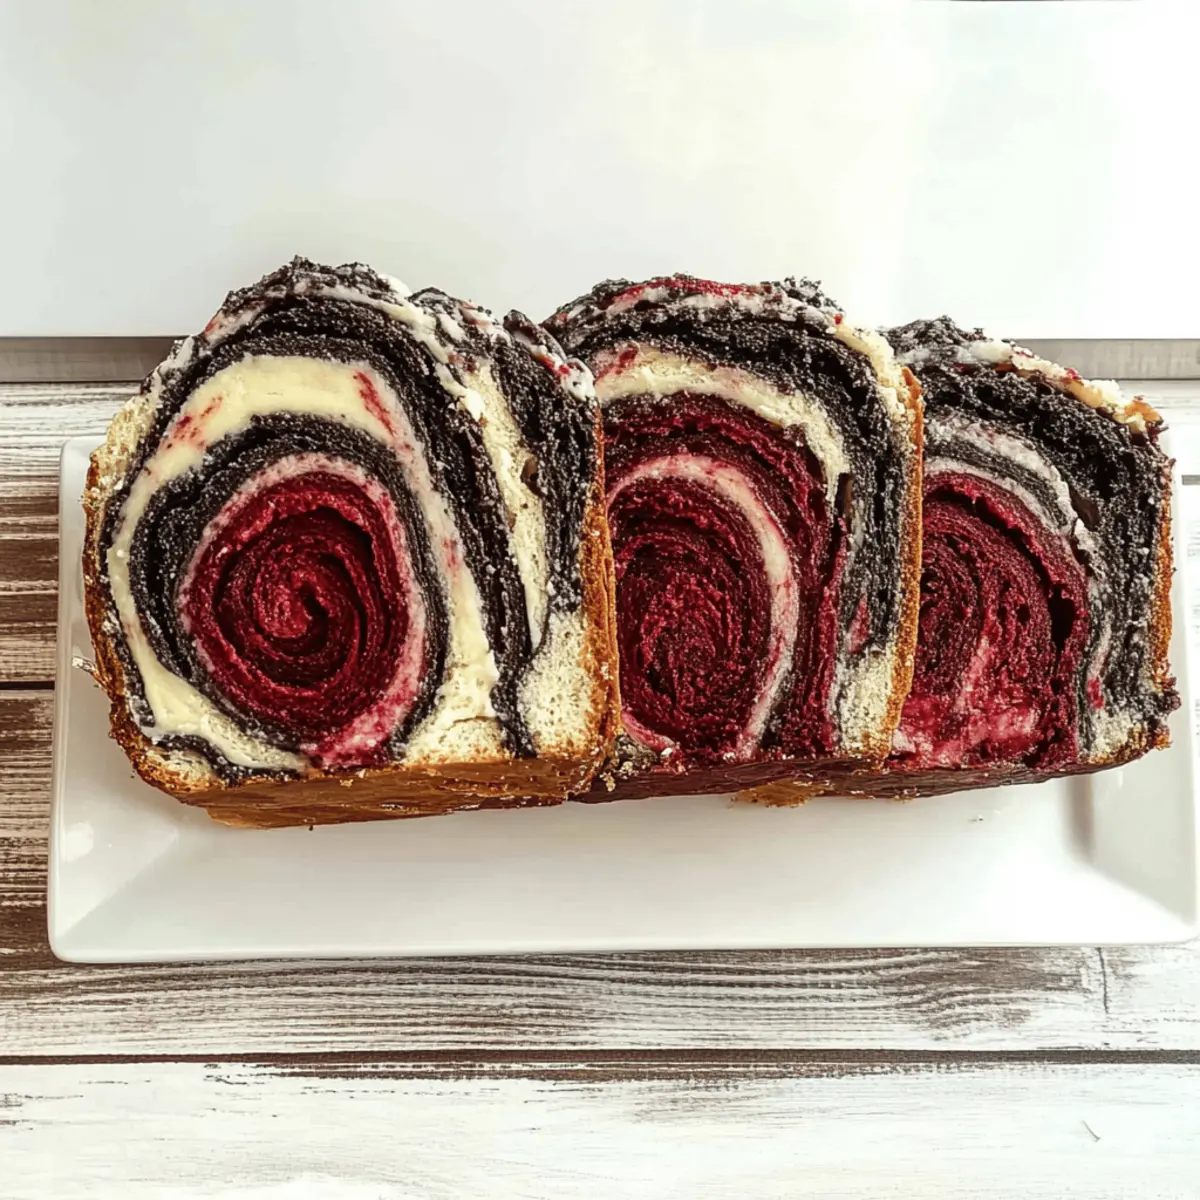
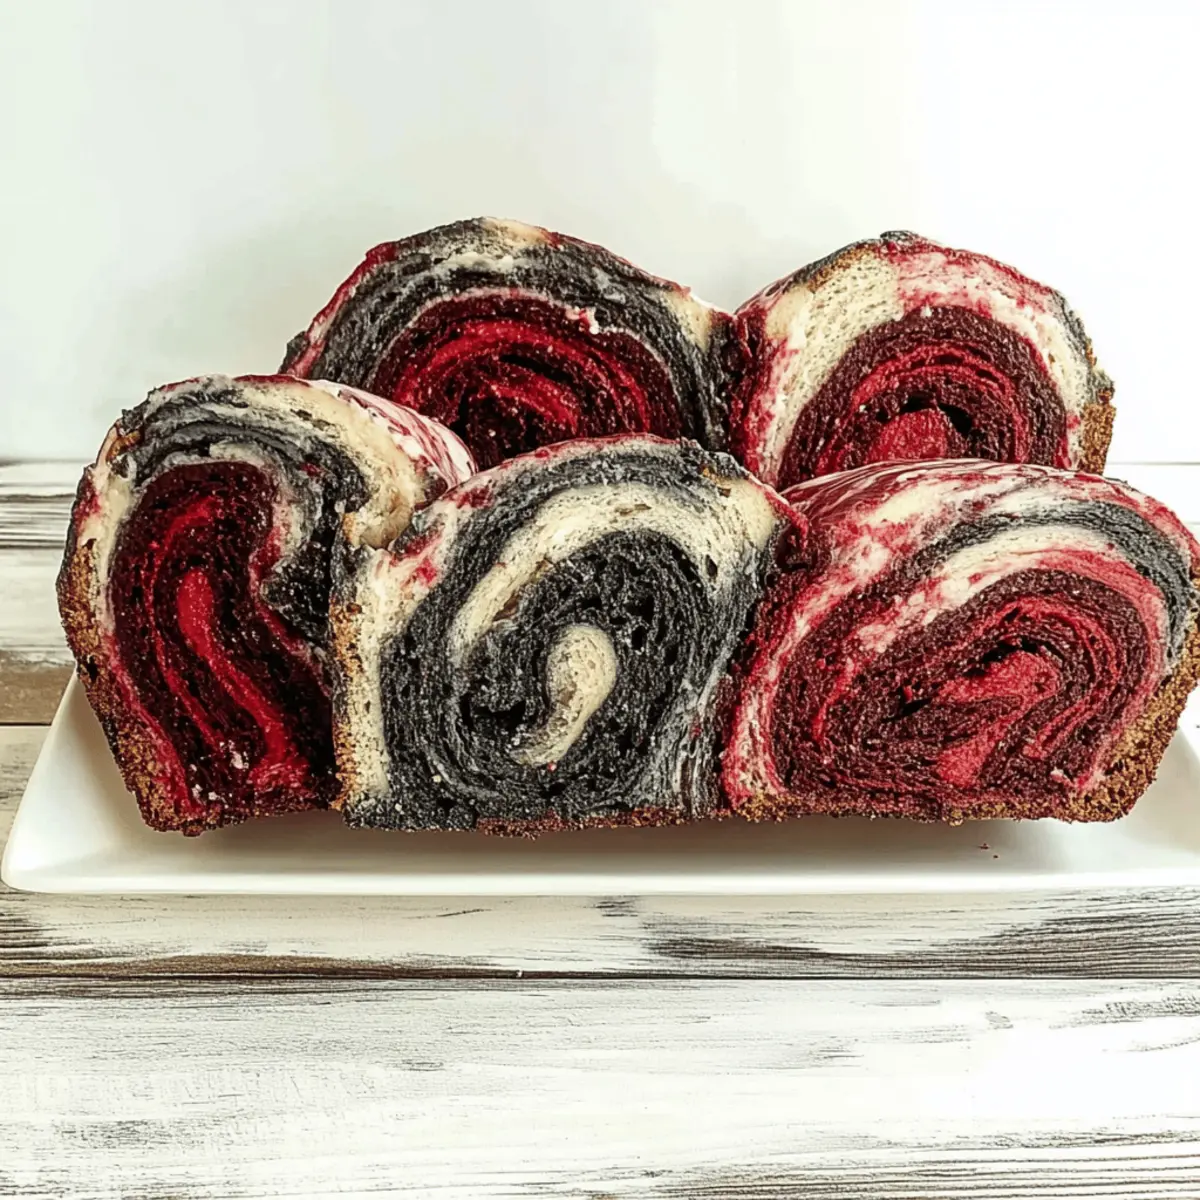
What’s that delightful aroma wafting through your kitchen? It’s the sound of ghoulish delight as I present to you my Spooktacular Vampire Bread! This Halloween, elevate your culinary game with this whimsical, low-fat treat featuring striking red and black swirls that are sure to impress any guest. Beyond being a visual centerpiece, this recipe is adaptable for all with its gluten-free and dairy-free options, ensuring everyone can join in on the festive fun. Whether served warm with a touch of butter or showcased at a potluck, you’ll adore how easy and versatile this bread can be. Ready to transform your baking experience this spooky season? Let’s dive into the eerie yet delightful world of Vampire Bread!
Why is Vampire Bread a Must-Try?
Visual Appeal: Every slice of this bread reveals stunning red and black swirls, making it the perfect centerpiece for your Halloween table.
Health-Conscious Option: With low-fat and gluten-free variations available, you can indulge in festive flavors without the guilt.
Simple Process: Making Vampire Bread requires only basic baking skills—perfect for both novice and seasoned chefs alike.
Endless Versatility: Whether served warm with a spread of butter or paired with savory soups, this bread adapts to any occasion. Check out my delicious Chimichurri Garlic Bread for another flavorful option!
Crowd-Pleasing Delight: Its whimsical appearance and delightful taste will impress guests at any gathering, making it a Halloween favorite.
Eager to explore personalized flavors? You can even incorporate spices or natural dyes to create your unique twist!
Vampire Bread Ingredients
For the Dough
- All-Purpose Flour – Provides structure and texture; substitute with gluten-free flour for a gluten-free version.
- Yeast – Acts as a leavening agent for lightness and rise; use active dry yeast or fresh yeast.
- Sugar – Adds sweetness and enhances browning; reduce for a less sweet bread.
- Salt – Enhances flavor and strengthens gluten; can be omitted for low-sodium diets.
- Water – Hydrates the dough; use warm water to effectively activate yeast.
- Butter (or oil) – Adds richness and moisture; substitute with plant-based butter for a dairy-free option.
For the Color
- Food Coloring (red and black) – Creates the festive swirl effect; consider natural dyes if preferred.
Step‑by‑Step Instructions for Vampire Bread
Step 1: Prepare the Dough
In a large mixing bowl, combine all-purpose flour, sugar, yeast, and salt. Gradually pour in warm water, mixing with a wooden spoon until the dough forms. Once combined, knead the dough on a floured surface for 8-10 minutes until it becomes smooth and elastic. You should feel the dough spring back when pressed; this indicates it’s ready for the first rise.
Step 2: First Rise
Cover the kneaded dough with a clean kitchen towel and let it rise in a warm area, such as near a preheating oven, for 1-2 hours. The dough should double in size; keep an eye on it! You’ll know it’s ready when it’s puffy and full of air bubbles, setting the stage for your delightful Vampire Bread.
Step 3: Color the Dough
Once the dough has risen, gently punch it down to release air. Divide the dough into two equal portions. In one bowl, add red food coloring, and in the other, add black food coloring. Knead each portion until the colors are fully incorporated, taking care to keep your hands clean from staining; use gloves if needed.
Step 4: Shape the Loaf
On a lightly floured surface, roll out each colored dough into rectangles of equal size. Layer the red dough atop the black dough, making sure to align the edges neatly. Carefully twist the layers together to create an eye-catching spiral. Form the twisted dough into a loaf shape, gently tucking the ends under.
Step 5: Second Rise
Place your shaped loaf on a parchment-lined baking sheet and cover it with a towel. Allow it to rise for another 30 minutes in a warm area. You’ll know it’s ready when it has puffed up slightly and the swirl pattern is more pronounced, preparing for the delightful baking ahead.
Step 6: Bake
Preheat your oven to 350°F (175°C). Once fully heated, bake the loaf for about 30 minutes. The Vampire Bread is done when it turns golden brown and sounds hollow when tapped on the bottom. A warm, enticing aroma will fill your kitchen, signaling that your Halloween treat is almost ready.
Step 7: Cool Down
After baking, transfer the loaf to a wire rack and let it cool for at least 15-20 minutes before slicing. This step is crucial, as it helps the bread set up properly while retaining its fluffy texture. Once cooled, enjoy the visually striking slices of your homemade Vampire Bread!
Storage Tips for Vampire Bread
-
Room Temperature: Store Vampire Bread in an airtight container at room temperature for up to 3 days to maintain its freshness and fluffy texture. Keep it away from direct sunlight or heat sources.
-
Fridge: If you plan to enjoy it beyond three days, wrap it tightly with plastic wrap and refrigerate for up to 1 week. This will help preserve its taste and texture.
-
Freezer: For longer preservation, freeze Vampire Bread by wrapping it tightly in aluminum foil or plastic wrap, then placing it in a freezer-safe bag. It can be kept for up to 3 months without losing its delightful swirls.
-
Reheating: When ready to serve, thaw the bread at room temperature for a few hours or overnight. Warm slices in the oven at 350°F (175°C) for about 10 minutes, or pop them in the toaster for a quick warm-up.
Expert Tips for Vampire Bread
-
Yeast Activation: Make sure your yeast is active by mixing it with warm water and a bit of sugar; it should bubble in 5-10 minutes. This is crucial for fluffy Vampire Bread!
-
Kneading Properly: Knead your dough until it’s smooth and elastic to ensure a good rise—aim for about 8-10 minutes. This helps develop the gluten structure needed for the perfect texture.
-
Coloring Technique: For vibrant swirls, use gel food coloring instead of liquid. Gel maintains dough consistency better and results in more striking colors without extra liquid.
-
Timing is Key: Keep an eye on the rising times; if your kitchen is cool, the dough may need more time to double in size. Patience leads to the best results!
-
Storage Tips: This playful Vampire Bread can be stored in an airtight container for up to 3 days; for longer freshness, freeze it wrapped tightly and thaw at room temperature.
-
Flavor Variations: Feel free to experiment with spices or herbs to personalize your Vampire Bread! A little cinnamon or nutmeg can add an intriguing twist to this already exciting recipe.
Make Ahead Options
These spooktacular Vampire Bread creations are perfect for busy home cooks! You can make the dough up to 24 hours in advance. After the first rise, simply punch down the dough, cover it tightly in plastic wrap, and refrigerate. This not only saves time but allows the flavors to deepen as it rests. When you’re ready to finish, take the dough out of the fridge for about 30 minutes to come to room temperature before proceeding with coloring and shaping. Bake it fresh to enjoy that delightful, warm aroma filling your kitchen, and rest assured it will be just as fluffy and festive!
Vampire Bread Variations & Substitutions
Unleash your creativity in the kitchen with these exciting twists!
-
Gluten-Free: Substitute all-purpose flour with your favorite gluten-free blend to cater to gluten sensitivities. A deliciously fluffy alternative awaits!
-
Dairy-Free: Replace butter with plant-based butter or oil for a dairy-free version without sacrificing flavor. You’ll still enjoy that delightful, rich texture!
-
Low Sugar: Reduce the sugar amount or use a natural sweetener, such as stevia or honey, to satisfy your sweet tooth while keeping it light. A subtle sweetness can still shine!
-
Spiced Up: Add dried herbs like rosemary or spices such as cinnamon or nutmeg for an enticing flavor twist. This little change can make your Vampire Bread oh-so-memorable!
-
Natural Dyes: For those looking for a healthier approach, try using beet juice for red and activated charcoal for black. Your bread will have a beautiful hue without artificial coloring!
-
Savory Add-ins: Toss in shredded cheese or olives into the dough for an unexpected savory touch. Imagine enjoying this bread fresh, with bursts of flavor in every bite!
-
Herb Butter: Serve your Vampire Bread with a homemade garlic or chimichurri butter for an irresistible accompaniment. Try it with my delicious Chimichurri Garlic Bread for more flavor ideas!
-
Sweet Topping: Spread a light layer of cream cheese or mascarpone, topped with a sprinkle of cinnamon sugar, for a delightful sweet treat after dinner. Perfect for satisfying those dessert cravings!
What to Serve with Vampire Bread?
Get ready to elevate your Halloween feast with delightful pairings that complement the whimsical flavors of this striking bread!
-
Creamy Pumpkin Soup: Smooth and savory, pumpkin soup enhances the bread’s playful sweetness, creating a perfect autumn harmony.
-
Garlic Butter Spread: The rich, savory notes of garlic butter spread elevate each slice to new heights, ideal for warm, buttery indulgence.
-
Chili Con Carne: Serve a hearty chili alongside the Vampire Bread to create a cozy, satisfying meal with delightful textures and flavors.
-
Savory Cheese Platter: Pair this bread with a selection of cheeses for a fun charcuterie setup; the contrasting flavors make for a delightful experience.
-
Melted Brie with Cranberries: The creamy, tangy brie with sweet cranberries creates a mouthwatering juxtaposition, perfect for a festive gathering.
-
Black Olive Tapenade: This savory spread provides a burst of umami and a rich textural component, seamlessly balancing the bread’s sweetness.
-
Warm Apple Cider: Sip on warm apple cider with spices to complement the whimsical spirit of Halloween, creating a cozy pairing for any occasion.
-
Mini Desserts: Consider serving bite-sized desserts like pumpkin spice cupcakes or ghostly meringues to round out the festive feast!
-
Spinach Salad: A fresh spinach salad with a tangy vinaigrette adds a crisp, refreshing element, enhancing your meal’s overall balance.
Vampire Bread Recipe FAQs
What type of flour can I use for Vampire Bread?
You can use all-purpose flour for a traditional Vampire Bread, but if you need a gluten-free option, simply substitute it with a gluten-free flour blend. The key is to ensure that the gluten-free flour contains xanthan gum or another binding agent to mimic the elasticity of regular flour.
How should I store Vampire Bread?
Store Vampire Bread in an airtight container at room temperature for up to 3 days to keep it fresh and fluffy. For longer preservation, you can keep it in the refrigerator for up to a week. Just make sure to wrap it tightly to avoid drying out.
Can I freeze Vampire Bread? How do I do it?
Absolutely! To freeze, wrap the Vampire Bread tightly in plastic wrap or aluminum foil, then place it in a freezer-safe bag. This way, it should last for up to 3 months. When you’re ready to eat it, thaw it at room temperature for a few hours or overnight. For warmed slices, heat in the oven at 350°F (175°C) for about 10 minutes or use a toaster for a quick warm-up.
What should I do if my dough isn’t rising?
If your dough isn’t rising, first check that your yeast is active. You can test the yeast by mixing it with warm water and a bit of sugar; it should bubble after 5-10 minutes. If your kitchen is cool, consider moving it to a warmer spot or covering it with a towel to insulate it better. Patience is key; it may just need a bit more time!
Are there any dietary considerations for Vampire Bread?
Yes! If you’re making this bread for a gluten-sensitive or lactose-intolerant crowd, you can easily adapt the recipe. Use gluten-free flour and a plant-based butter or oil to ensure it’s suitable for those with dietary restrictions. Always check food colorings to confirm they are free from allergens if dealing with food allergies!
What can I do with leftover Vampire Bread?
If you have leftover Vampire Bread, consider turning it into delicious French toast or croutons! Simply slice it up, dip in an egg mixture, and cook on a skillet for a festive breakfast. Alternatively, cube the bread and toast it for crispy croutons that’ll brighten up salads or soups!
Vampire Bread: Irresistibly Fluffy Halloween Delight
Ingredients
Equipment
Method
- In a large mixing bowl, combine all-purpose flour, sugar, yeast, and salt. Gradually pour in warm water, mixing with a wooden spoon until the dough forms. Knead on a floured surface for 8-10 minutes until smooth and elastic.
- Cover the kneaded dough with a towel and let it rise in a warm area for 1-2 hours until doubled in size.
- Punch down the risen dough and divide it into two portions. Add red food coloring to one portion and black food coloring to the other, kneading each until colors are incorporated.
- Roll out each colored dough into equal-sized rectangles. Layer the red dough on top of the black dough and twist together to form a spiral. Shape into a loaf and tuck the ends under.
- Place the loaf on a parchment-lined baking sheet and cover with a towel. Let it rise for another 30 minutes until puffed.
- Preheat the oven to 350°F (175°C) and bake the loaf for about 30 minutes until golden brown and hollow sound when tapped.
- Transfer the loaf to a wire rack and cool for at least 15-20 minutes before slicing.
Leave a Reply