
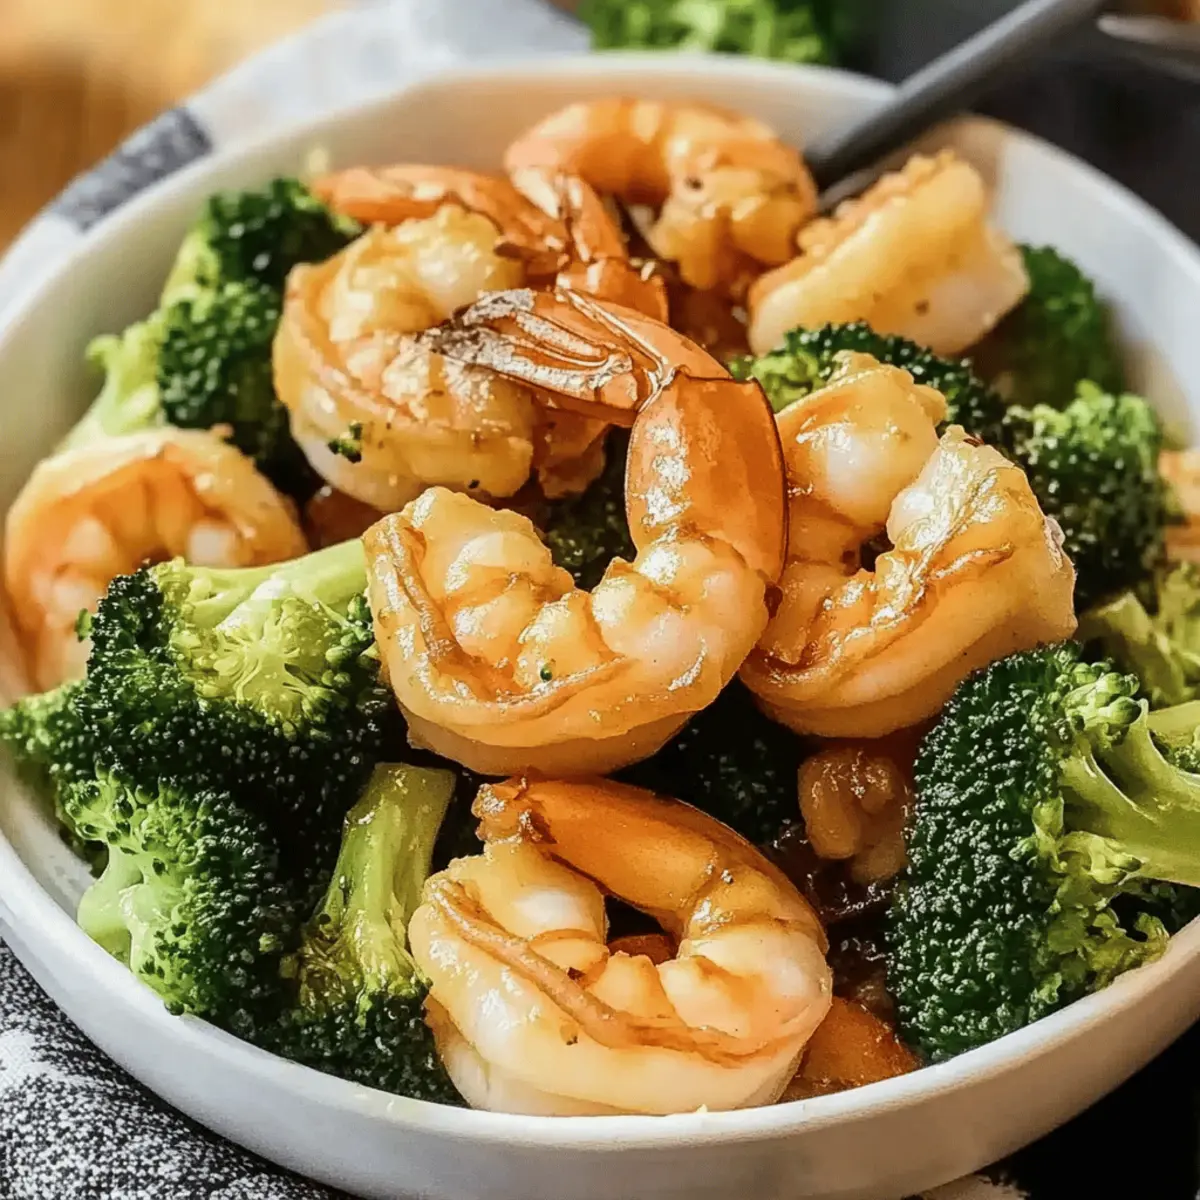
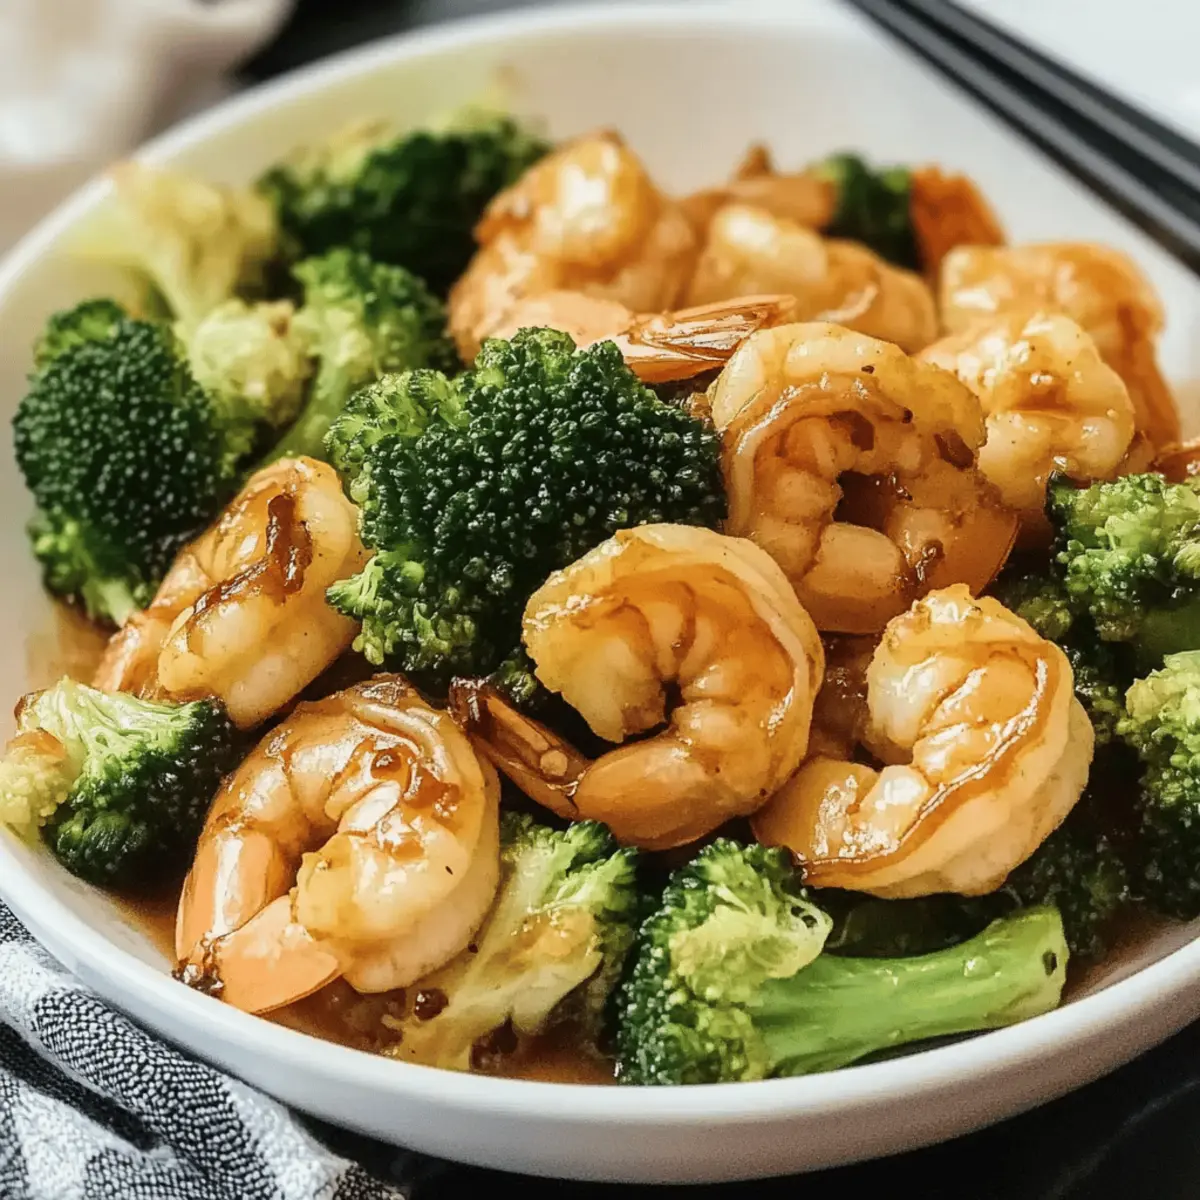
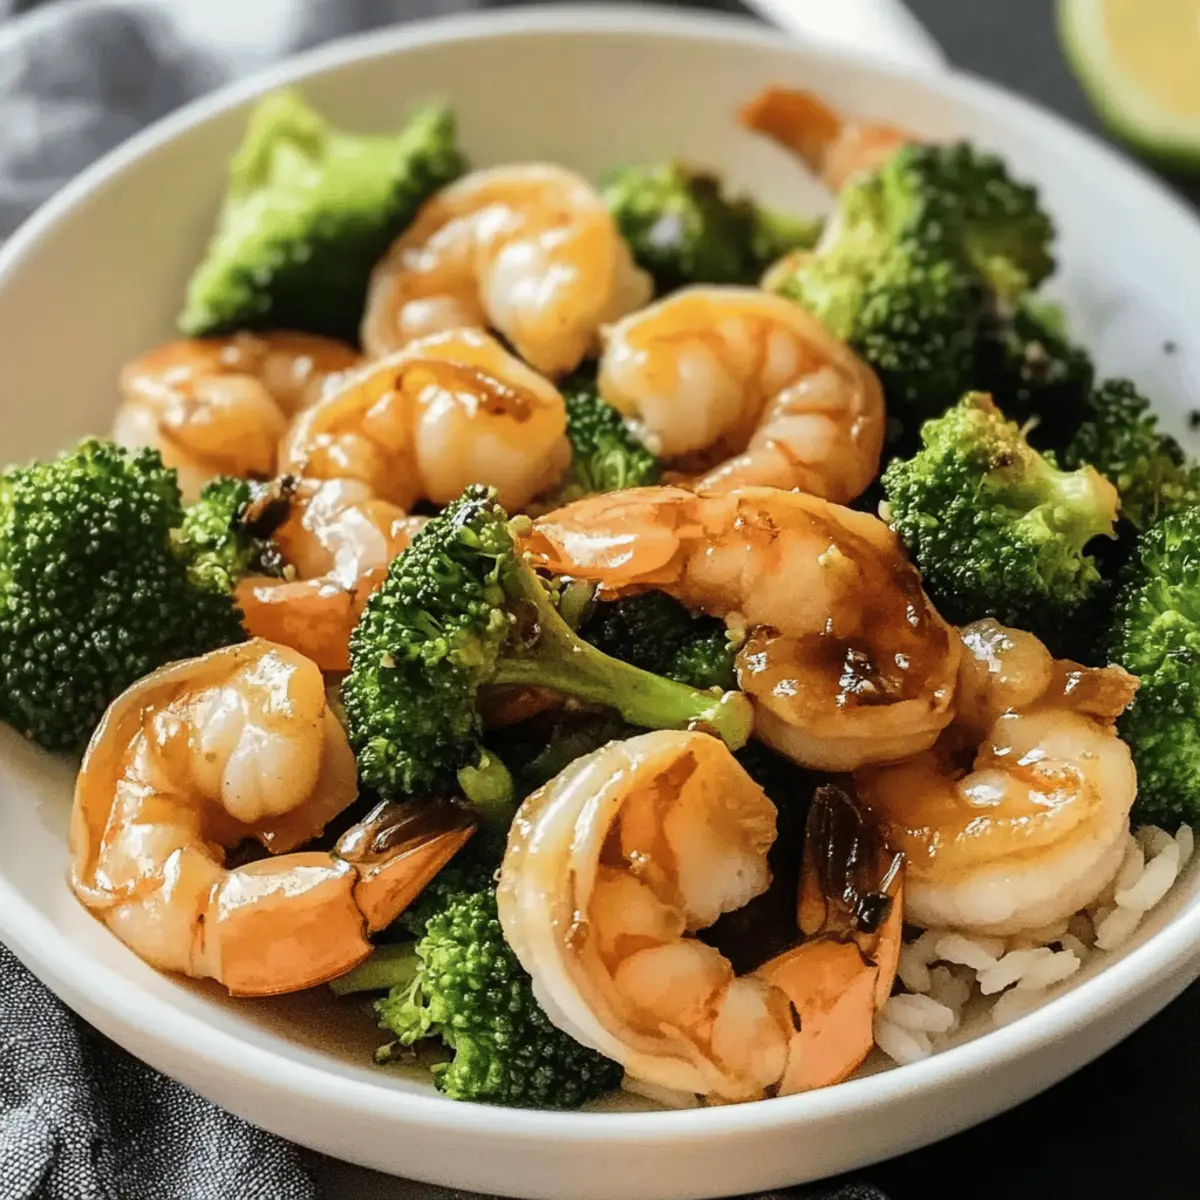
As the tantalizing scent of garlic and soy sauce wafts through the air, I can’t help but feel transported to a bustling Japanese steakhouse. This Quick and Easy Hibachi Shrimp recipe has become my go-to for lightening up busy weeknights, wrapping flavorful tenderness in just 10 minutes. With succulent shrimp paired alongside bright, crunchy broccoli, it’s not just quick to prepare but also packed with protein, making it a nourishing choice for anyone seeking to break free from fast food routines. Plus, the beauty of this dish lies in its adaptability—you can easily swap in your favorite veggies or proteins for a customized experience every time. Ready to make your kitchen the star of the show? Let’s dive into this delightful recipe!
Why Love Easy Hibachi Shrimp?
Quick, flavorful meal: This recipe is your ticket to a tasty dinner in just 10 minutes, perfect for those hectic weeknights.
Protein-packed goodness: With shrimp as the main star, you’re getting a healthy dose of protein that will keep you satisfied.
Customizable options: Feeling creative? Swap in your favorite veggies or proteins, like chicken or even tofu for a vegetarian twist.
Elevate your weeknight dining: This dish not only warms the belly but also impresses guests—serve it alongside hibachi fried rice for a complete experience!
Simplicity at its best: Minimal ingredients and easy instructions empower even the busiest home cooks to create something special.
A burst of umami: The butter and soy sauce meld beautifully to create a rich flavor that brings restaurant vibes to your table.
Easy Hibachi Shrimp Ingredients
• The vibrant flavors of Easy Hibachi Shrimp begin with fresh ingredients that make your dish truly shine.
For the Shrimp
- Large Shrimp – Essential for a hearty dish; opt for thawed if using frozen.
- Kosher Salt – Enhances the natural shrimp flavor; adjust according to taste preferences.
- Black Pepper – Provides a subtle heat; use freshly cracked for maximum flavor.
For the Vegetables
- Broccoli Florets – Adds crunch and nutrition; fresh is preferred, but pre-cut works well.
- Water – Used for steaming broccoli to achieve perfect tenderness.
For the Sauce
- Butter – Adds richness and flavor to the dish; do not skip for an optimal taste.
- Soy Sauce – Essential for the umami flavor; consider using low-sodium for a healthier option.
- Fresh Lemon Juice – Brightens the dish and adds a needed acidic balance; one splash is sufficient.
Step‑by‑Step Instructions for Easy Hibachi Shrimp
Step 1: Prep the Shrimp
Begin by ensuring your large shrimp are cleaned and thoroughly dried. If you’re using frozen shrimp, make sure they are fully thawed and patted dry to achieve the best sear. This initial step is key for preparing delicious Easy Hibachi Shrimp, ensuring that each piece cooks evenly and crisps up beautifully.
Step 2: Steam the Broccoli
In a preheated skillet over medium-high heat, add the broccoli florets along with 1/4 cup of water. Cover the skillet and steam the broccoli for 1–2 minutes, or until it turns vibrant green and is just tender. This steaming process not only preserves the broccoli’s crunch but also sets the stage for a perfect flavor combination in your Easy Hibachi Shrimp.
Step 3: Cook the Shrimp
Once the broccoli is steamed, melt 1 tablespoon of butter in the same skillet. Add the prepared shrimp in a single layer, making sure not to overcrowd them. Season with kosher salt and freshly cracked black pepper. Sear them for 1 minute until they turn pink and opaque on one side, creating that enticing aroma that signifies a delicious meal is on its way.
Step 4: Flavor and Flip
Gently flip each shrimp over in the skillet after the initial cooking time. Pour in 1 tablespoon of soy sauce and allow the shrimp to cook for another minute. As they sizzle, the soy sauce will infuse the shrimp with rich umami flavor, further enhancing your Easy Hibachi Shrimp dish while keeping it tender and juicy.
Step 5: Combine and Finish
Next, return the steamed broccoli to the pan with the shrimp, adding 2 additional tablespoons of soy sauce for even more flavor. Stir everything together and let it cook for another minute, allowing the flavors to meld. Finish by deglazing the pan with a splash of fresh lemon juice, which adds brightness and balances the savory elements of your dish.
Step 6: Serve the Dish
Once everything is cooked to perfection, remove the skillet from heat. Plate the hot Easy Hibachi Shrimp alongside the vibrant broccoli, making sure to showcase the beautiful colors. Optionally, garnish with sesame seeds and serve with homemade yum yum sauce for an added touch. Enjoy this delightful meal right away for the best flavors and textures!
Helpful Tricks for Easy Hibachi Shrimp
-
Dry Shrimp First: Pat your shrimp completely dry before cooking to ensure a great sear instead of steaming. This small step makes a big difference in flavor and texture.
-
Prevent Overcrowding: Cook the shrimp in batches if your skillet is small. Overcrowding can lead to uneven cooking, leaving some shrimp undercooked while others become rubbery.
-
Watch the Broccoli: Steam the broccoli just until tender to maintain its vibrant color and crunch. Overcooking can result in a dull appearance and less enticing texture.
-
Quality Soy Sauce: Use a high-quality soy sauce for a deeper umami flavor in your Easy Hibachi Shrimp. Consider low-sodium options if you’re watching your salt intake.
-
Serve Immediately: For the best flavor and texture experience, serve your Easy Hibachi Shrimp right after cooking. This dish tastes best fresh from the pan!
Make Ahead Options
These Easy Hibachi Shrimp are perfect for meal prep enthusiasts! You can prep the shrimp by cleaning and drying them up to 24 hours in advance; just be sure to refrigerate them in an airtight container to maintain their freshness. Additionally, you can steam the broccoli florets ahead of time and store them in the fridge for up to 3 days. When you’re ready to serve, simply follow the cooking instructions, combining the shrimp and broccoli and adding those delicious flavors—only taking about 5 minutes! This way, you’ll have a scrumptious meal ready to enjoy with minimal effort, leaving more time for what matters most.
Easy Hibachi Shrimp Variations & Substitutions
Feel free to get creative and customize this dish to match your taste preferences and dietary needs!
- Veggie Swap: Replace broccoli with zucchini, bell peppers, or snap peas for a colorful twist. The crunch from these veggies adds delightful texture.
- Umami Boost: Add sliced mushrooms to enhance the savory flavor profile. They absorb the wonderful sauce beautifully, making each bite rich and satisfying.
- Protein Change: Swap shrimp for chicken or tofu for an equally delicious option. Both alternatives soak up the flavors while providing their unique textures.
- Spicy Option: Add red pepper flakes or Sriracha for an exciting kick. Just a pinch will elevate the dish, leaving your taste buds dancing!
- Herb Garnish: Finish with fresh herbs like green onions or cilantro for an aromatic touch. The bright pop of color and flavor elevates your plate to new heights.
- Citrus Twist: Experiment with citrus juices by swapping lemon for lime or orange. Each brings a different zing, refreshing your dish and palate.
- Sauce Variation: Try teriyaki or coconut aminos instead of soy sauce for a unique flavor twist. Both alternatives offer a different sweetness that complements the shrimp beautifully.
If you’re feeling adventurous, you might also enjoy pairing your Easy Hibachi Shrimp with side dishes like hibachi fried rice or succulent Garlic Butter Shrimp for a complete feast! Let your kitchen creativity flow!
What to Serve with Easy Hibachi Shrimp
As the savory scent of hibachi fills your kitchen, it’s time to think about delightful accompaniments that elevate your dining experience.
- Hibachi Fried Rice: This classic side brings heartiness with tender rice and crisp vegetables, perfectly complementing the sautéed shrimp’s vibrant flavors.
- Crispy Spring Rolls: These light, crunchy bites offer a fun contrast to the tender shrimp, filled with tasty veggies that add texture and taste.
- Garlic Edamame: Lightly salted and seasoned with garlic, these vibrant green pods provide a fresh, protein-packed pairing that balances the meal beautifully.
- Cucumber Salad: Crisp cucumber slices tossed in a light sesame oil dressing deliver refreshing crunch and a cooling contrast to the warm shrimp.
- Miso Soup: This light broth, rich in savory umami flavor, acts as a warm, comforting element that complements the meal’s overall richness.
- Homemade Yum Yum Sauce: A creamy, tangy addition that can enhance every bite, this sauce is perfect for dipping or drizzling over the shrimp.
- Fruit-Infused Iced Tea: A chilled beverage with a refreshing twist, add slices of lemon or peach to elevate this pairing and cleanse the palate between bites.
- Mochi Ice Cream: For a delightful finish, this chewy, sweet treat comes in various flavors, offering a light and fun dessert to wrap up your meal.
How to Store and Freeze Easy Hibachi Shrimp
- Fridge: Store any leftovers in an airtight container for up to 3-4 days. For the best taste, gently reheat in a skillet over low heat, allowing the shrimp to warm thoroughly without becoming rubbery.
- Freezer: For longer storage, lay cooked Easy Hibachi Shrimp in a single layer on a baking sheet and freeze until solid. Transfer to a freezer-safe container for up to 2 months, ensuring it’s well sealed to prevent freezer burn.
- Reheating Tips: When ready to enjoy your frozen shrimp, thaw in the fridge overnight. Reheat in a skillet, adding a bit of water or broth to keep it moist, and stir until heated through.
- Flavor Retention: Adding a splash of fresh lemon juice while reheating can help refresh the flavors of your Easy Hibachi Shrimp, making them taste just as delicious as when they were first prepared.
Easy Hibachi Shrimp Recipe FAQs
How do I select the best shrimp for this recipe?
When choosing shrimp, look for large, firm specimens that are consistent in color, without dark spots or unpleasant odors. Fresh shrimp should be slightly translucent and have a clean, briny scent. If you’re buying frozen shrimp, ensure they are properly thawed and well-packaged to avoid freezer burn.
What is the best way to store leftovers?
Store any leftover Easy Hibachi Shrimp in an airtight container in the refrigerator for up to 3-4 days. For optimal flavor, reheat gently in a skillet over low heat to avoid rubbery shrimp. I often find that adding a splash of water or broth while reheating can help retain moisture.
Can I freeze Easy Hibachi Shrimp?
Absolutely! To freeze, lay cooked shrimp in a single layer on a baking sheet and freeze until solid. Once frozen, transfer the shrimp to a freezer-safe container or a resealable bag, making sure to remove as much air as possible. They can be stored for up to 2 months. When ready to eat, simply thaw overnight in the refrigerator and reheat gently.
What should I do if the shrimp are overcooked?
If your shrimp become rubbery, it’s usually because they were cooked for too long. To avoid this, ensure you’re cooking at high heat and for a short period—just 1-2 minutes per side is typically sufficient. Also, monitor them closely; they cook quickly and are ready when they turn pink and opaque.
Can I make this dish gluten-free?
Yes! To make Easy Hibachi Shrimp gluten-free, simply substitute regular soy sauce with gluten-free alternatives like tamari or coconut aminos. Both options provide a similar umami flavor while accommodating dietary restrictions.
What vegetables can I use instead of broccoli?
The more the merrier! Feel free to substitute broccoli with other crunchy vegetables like zucchini, bell peppers, or sugar snap peas. You could even add some sliced mushrooms for an extra umami kick. Just remember to adjust cooking times as needed to ensure everything is perfectly tender!

Sizzling Easy Hibachi Shrimp Ready in Just 10 Minutes!
Ingredients
Equipment
Method
- Begin by ensuring your large shrimp are cleaned and thoroughly dried.
- In a preheated skillet over medium-high heat, add the broccoli florets along with 1/4 cup of water. Cover the skillet and steam for 1-2 minutes.
- Melt 1 tablespoon of butter in the same skillet and add the shrimp in a single layer, season with salt and pepper. Sear for 1 minute.
- Gently flip each shrimp over in the skillet. Pour in 1 tablespoon of soy sauce and let cook for another minute.
- Return the steamed broccoli to the pan with the shrimp, and add 2 additional tablespoons of soy sauce. Stir and cook for another minute.
- Plate the Easy Hibachi Shrimp alongside the broccoli and enjoy!
Leave a Reply