
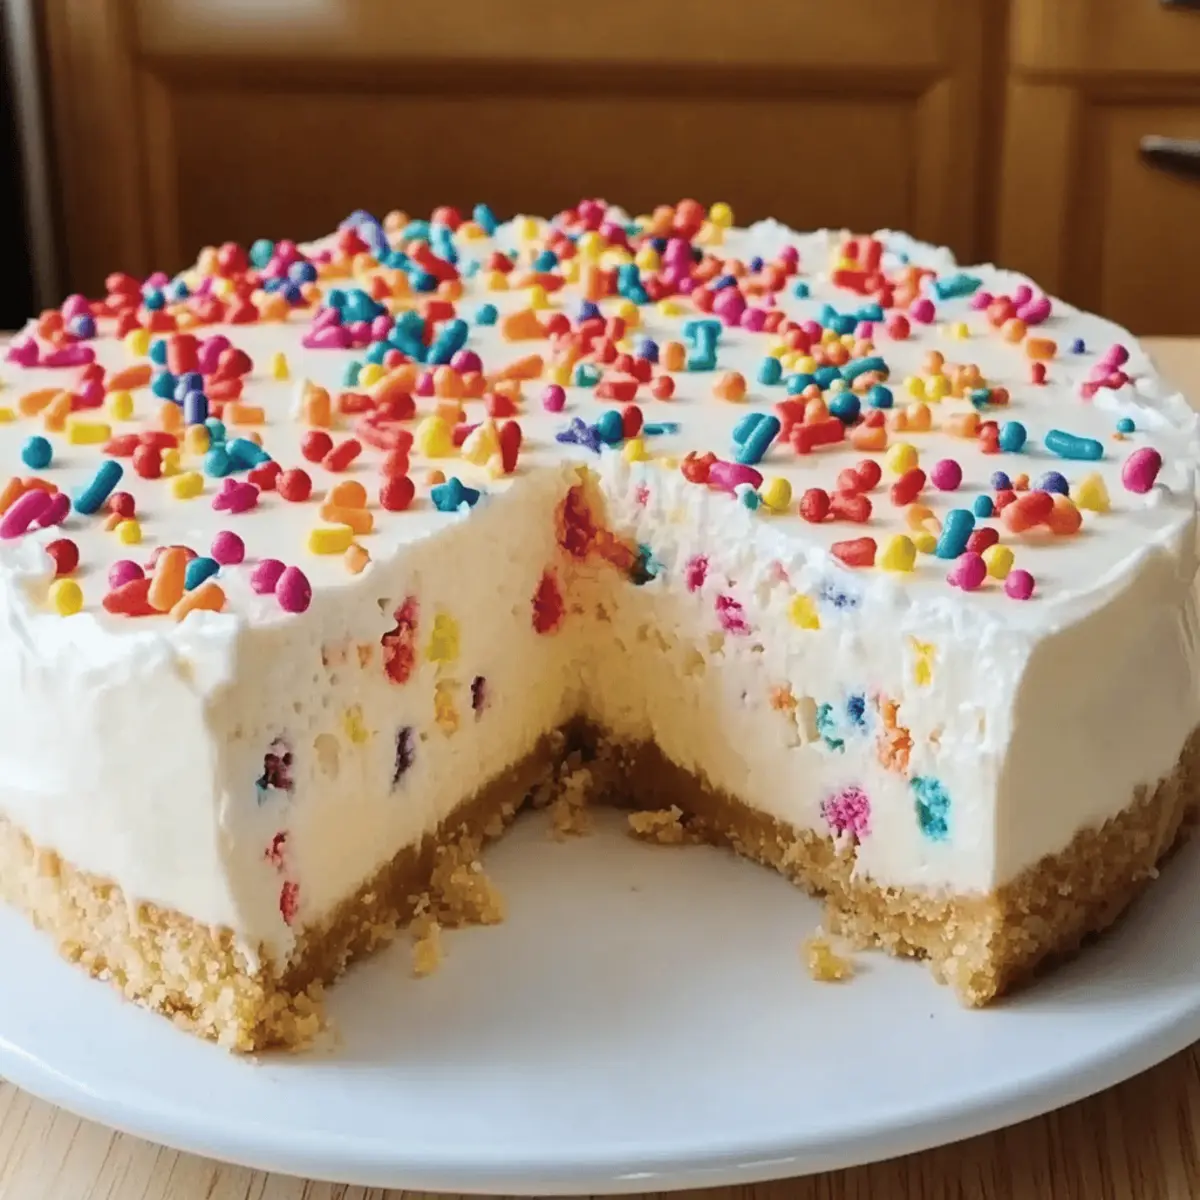
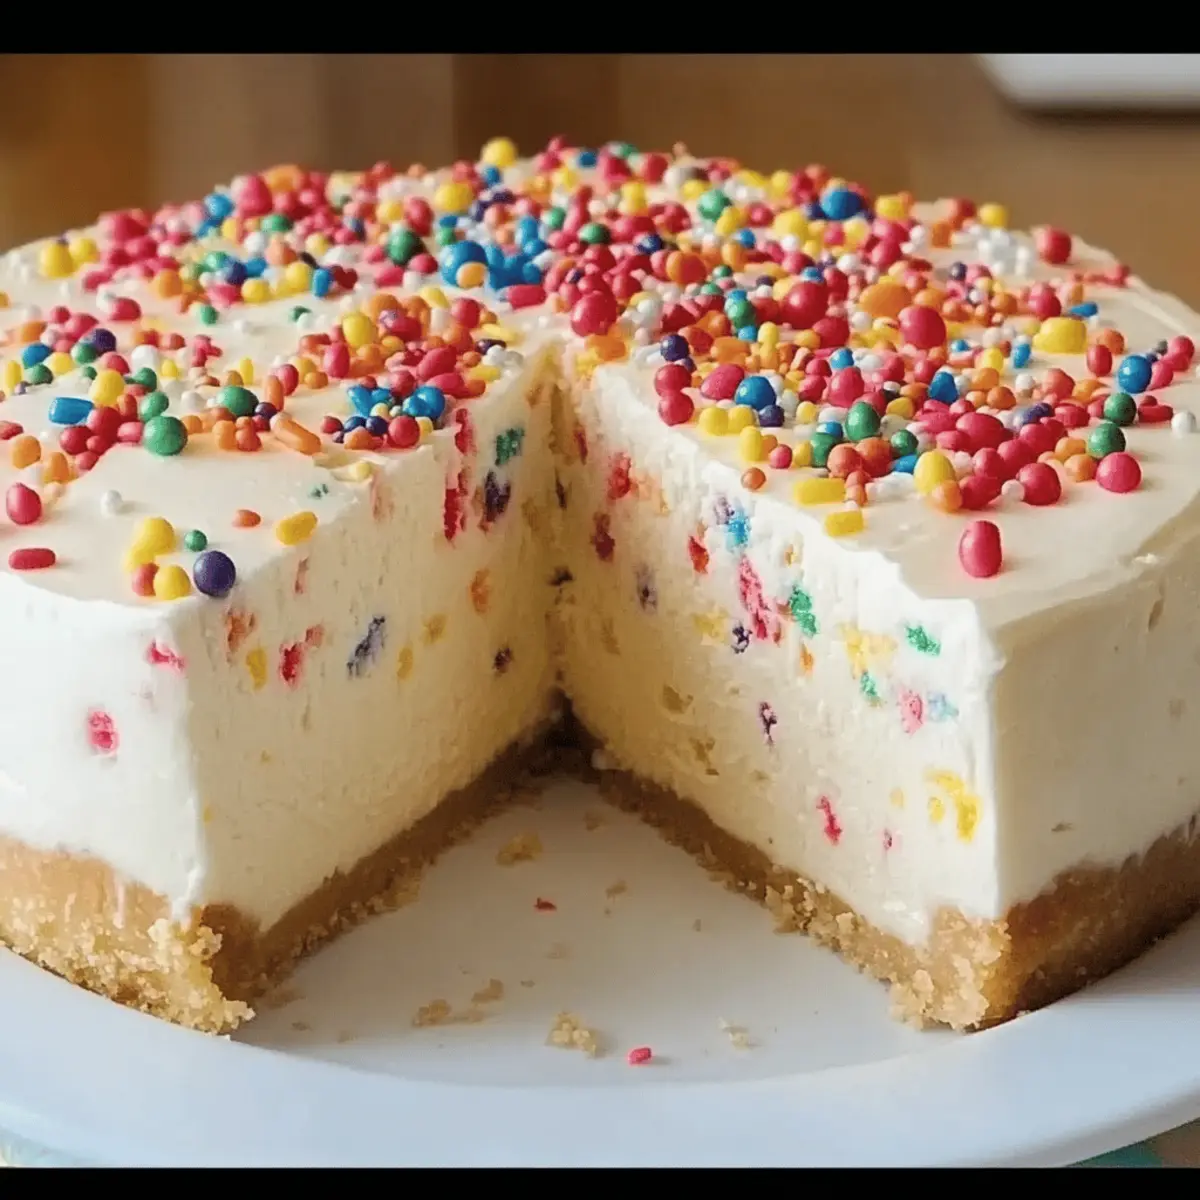
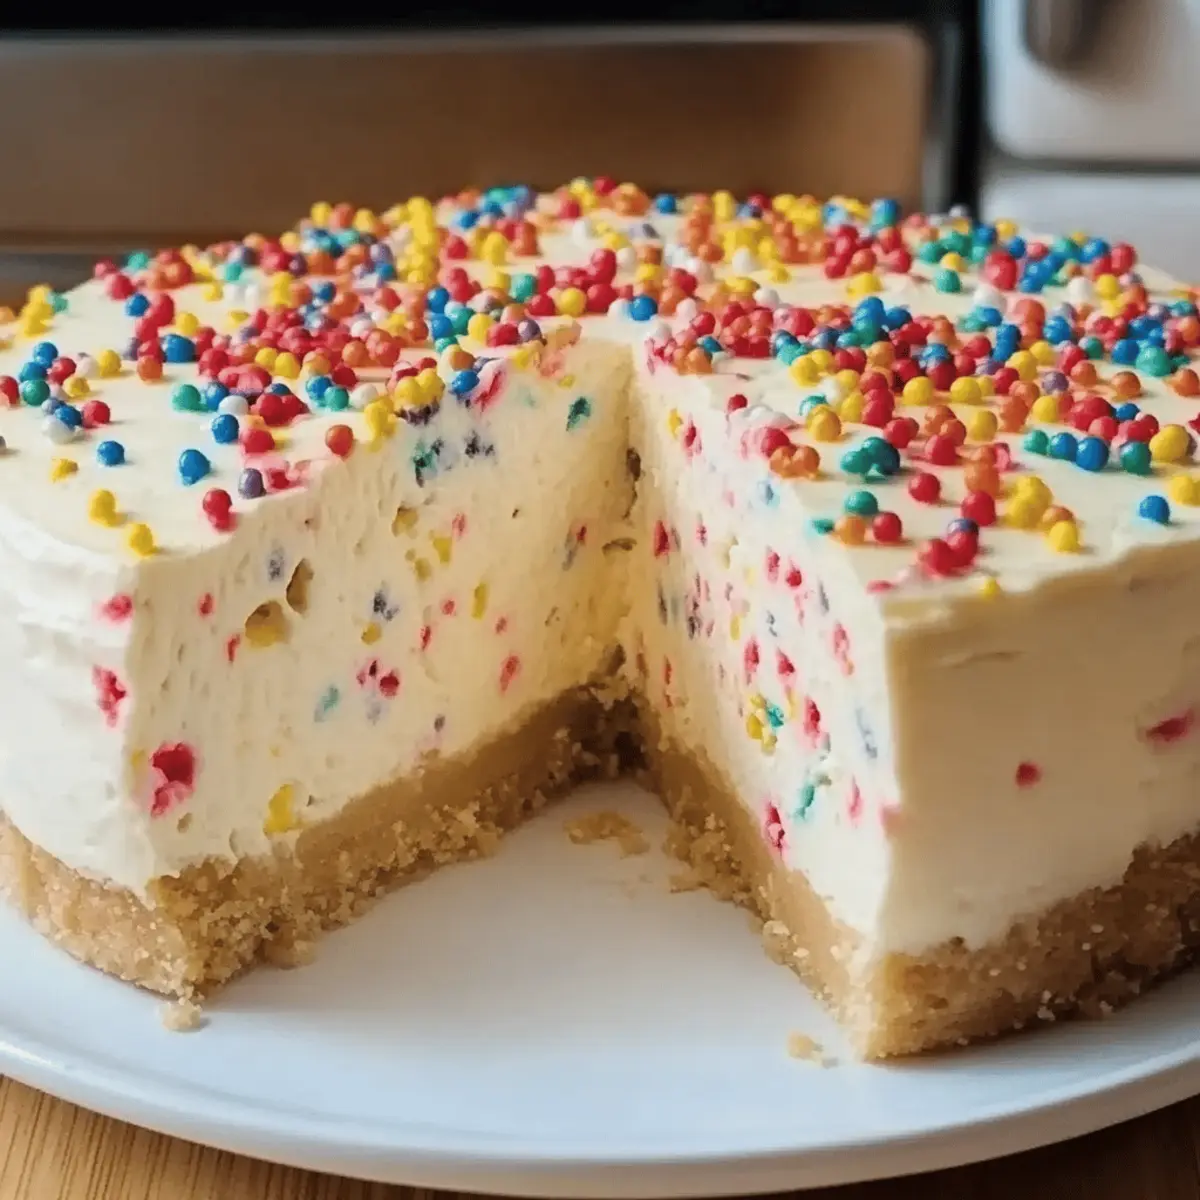
Stepping into the kitchen with a mission to create a celebration-worthy dessert often brings a thrill—that first moment when sugar meets butter, and visions of sweetness come to life. This Creamy Birthday Cheesecake with Rainbow Jimmies has captured hearts and taste buds alike, making it the ultimate crowd-pleaser for any festive occasion. Crafted with a buttery graham cracker crust and a velvety filling of cream cheese and sour cream, this easy recipe not only delivers on flavor, but it’s also versatile enough to accommodate gluten-free and dairy-free diets. Whether it’s a birthday bash or just an excuse to indulge, this cheesecake is sure to be the star of your dessert table. Curious about the simple steps to achieve this creamy masterpiece? Let’s dive in!

Why Is This Cheesecake So Special?
Creamy, luscious texture: The union of cream cheese and sour cream creates an unforgettably smooth filling that melts in your mouth.
Festive flair: Bright rainbow jimmies not only enhance the visual appeal but also make it a perfect fit for any celebration.
Versatile options: Easily adjust to dietary needs by using gluten-free graham crackers or dairy-free alternatives, ensuring everyone can enjoy a slice.
Quick to whip up: This easy recipe saves you time without skimping on flavor, perfect for last-minute gatherings.
Crowd-pleaser: With its rich flavor and creamy consistency, this cheesecake will have your guests coming back for seconds, or even thirds! Treat yourself or surprise friends, and pair it with a side of Fried Strawberry Cheesecake for an indulgent dessert experience.
Rich & Creamy Cheesecake Ingredients
• Sweeten your baking adventure with this delightful dessert!
For the Crust
- Graham Cracker Crumbs – Provides structure and crunch; use crushed cookies like Oreos for a unique twist.
- Granulated Sugar – Adds sweetness to the crust; consider coconut sugar for a deeper caramel flavor.
- Unsalted Butter – Binds everything together; swap for coconut oil for a dairy-free alternative.
For the Filling
- Cream Cheese – Creates the cheesecake’s rich and creamy texture; ensure it’s softened for easy blending.
- Sour Cream – Adds tanginess and smoothness vital for flavor; don’t skip this ingredient!
- Vanilla Extract – Elevates the flavor profile, making it even more delectable.
- Eggs – Provide structure; must be room temperature for consistent blending.
For the Topping
- Rainbow Jimmies – Adds a festive touch and gets everyone excited; feel free to use other sprinkles or skip for a classic look.
- Whipped Cream – A luscious topping; opt for heavy whipped cream or omit based on preference.
This rich & creamy cheesecake is perfect for all celebrations—let your creativity flow with personal touches and substitutions as you bake!
Step‑by‑Step Instructions for Creamy Birthday Cheesecake with Rainbow Jimmies
Step 1: Preheat the Oven
Begin by preheating your oven to 350°F (175°C). This warm-up is essential for achieving that perfect golden top on your Creamy Birthday Cheesecake. Make sure all your ingredients are at room temperature to ensure smooth blending, so take out your cream cheese and eggs ahead of time.
Step 2: Prepare the Crust
In a mixing bowl, combine the graham cracker crumbs, granulated sugar, and melted unsalted butter until well blended. The mixture should resemble wet sand. Press this crumb mixture firmly into the bottom of a 9-inch springform pan, making sure it’s even and packed tight. Use a flat-bottomed measuring cup for a neat finish.
Step 3: Wrap the Springform
Take heavy-duty aluminum foil and wrap it around the outside of the springform pan. This step is crucial to create a water bath for your cheesecake, protecting it from direct heat and moisture during baking. It also helps achieve that creamy texture, so wrap it tightly!
Step 4: Beat the Cream Cheese
In a large mixing bowl, use an electric mixer to beat the softened cream cheese on medium speed until it becomes creamy and smooth. Gradually add granulated sugar and continue mixing well. This step ensures there are no lumps in your filling, making your Creamy Birthday Cheesecake extra luscious.
Step 5: Add Remaining Ingredients
Lower the mixing speed and carefully mix in the sour cream and vanilla extract until well combined. Next, add the eggs one at a time, mixing on low speed just until blended after each addition. Be cautious not to overmix, as it can lead to cracks during baking.
Step 6: Fold in Rainbow Jimmies
Using a spatula, gently fold in the rainbow jimmies into your creamy mixture. This step adds a festive flair and delightful bursts of color to your filling without letting the fun sprinkles dissolve. Ensure they are evenly distributed for a joyous appearance throughout the cheesecake.
Step 7: Bake in Water Bath
Pour your cheesecake filling into the prepared crust in the springform pan. Place this pan inside a larger roasting pan, and carefully add hot water around it until it reaches halfway up the sides of the springform. Bake in the oven for about 60–70 minutes, or until the edges are set and the center has a slight jiggle.
Step 8: Cool & Refrigerate
Once baked, carefully remove the cheesecake from the oven and the water bath, letting it cool on a wire rack for about an hour. After cooling, refrigerate the cheesecake for several hours or overnight to achieve its rich and creamy texture. This chilling is key for the best taste and consistency.
Step 9: Serve & Enjoy
When ready to serve, remove the cheesecake from the springform pan. Top with whipped cream and a sprinkle of additional rainbow jimmies for some extra cheer. Now, your beautiful Creamy Birthday Cheesecake is ready to steal the spotlight at your celebration!
Make Ahead Options
These Creamy Birthday Cheesecakes are ideal for those busy home cooks looking to save time without sacrificing flavor! You can prepare the graham cracker crust up to 24 hours in advance and refrigerate it, ensuring it stays fresh and ready for topping. The cheesecake filling can also be mixed ahead and stored in the fridge for up to 3 days before baking; just cover it tightly to prevent any off-flavors. When you’re ready to bake, pour the filling into the prepared crust and bake as instructed. Rest assured, this cheesecake will be just as delicious and creamy after being made ahead, allowing you to enjoy more time with your guests!
Variations & Substitutions for Rich & Creamy Cheesecake
Feel free to adapt this recipe to meet your dietary needs or to experiment with new flavors and textures!
- Gluten-Free: Substitute with gluten-free graham cracker crumbs or almond flour for a delectable crust. Your cheesecake will be just as delicious without compromising on flavor!
- Chocolate Lovers: For a richer twist, swap half of the cream cheese with chocolate cream cheese, creating a delightful chocolatey goodness that will satisfy any sweet tooth.
- Fruit-Infused: Add a refreshing touch by incorporating fresh fruit puree, such as raspberry or strawberry, into the filling for a burst of natural sweetness and vibrant color.
- Nutty Crunch: Introduce a delightful texture by mixing crushed nuts like walnuts or pecans into the crust. This adds complexity and a lovely crunch that elevates the cheesecake experience.
- Dairy-Free: Opt for plant-based cream cheese and sour cream to make this cheesecake dairy-free without sacrificing its luscious creaminess. Your guests might not even notice the swap!
- Spice It Up: Enhance the flavor with a pinch of cinnamon or nutmeg in the filling, giving it a warm, cozy twist that’s perfect for fall celebrations.
- Caramel Swirl: For an indulgent treat, swirl in some caramel sauce with the cheesecake filling before baking. It adds a rich flavor dimension that pairs beautifully with the creaminess.
- Citrus Zest: Brighten the cheesecake with some lemon or orange zest in the filling. This refreshing note cuts through the richness, making each bite a delightful surprise.
If you’re in love with cheesecake, don’t miss out on trying delicious variations like Blueberry Crumble Cheesecake or indulge in the crispy layers of Strawberry Crunch Cheesecake Tacos for another lovely twist!
Storage Tips for Creamy Birthday Cheesecake
Fridge: Store your cheesecake in an airtight container in the fridge for up to 3 days. This will keep the rich & creamy cheesecake fresh while maintaining its delightful texture.
Freezer: For longer storage, slice your cheesecake and wrap each piece in plastic wrap, then place them in a freezer-safe container. It can be stored in the freezer for up to 1 month without losing flavor!
Thawing: To enjoy frozen slices, transfer them to the fridge for 4-6 hours or overnight. This gentle thaw prevents sogginess, ensuring each bite is as delicious as the first.
Reheating (Optional): If you prefer your cheesecake slightly warm, place a slice in the microwave for about 10-15 seconds. Avoid overheating to preserve the creamy texture!
Expert Tips for Creamy Birthday Cheesecake
-
Room Temperature Ingredients: Ensure all your ingredients, especially cream cheese and eggs, are at room temperature. This helps create a smooth, rich & creamy cheesecake without lumps.
-
Press Crust Firmly: Firmly packing your crust mixture into the pan is essential. A well-pressed crust provides stability and keeps the cheesecake intact when sliced.
-
Avoid Overmixing Eggs: Mix the eggs in on low speed and only until incorporated. Overmixing can cause cracks to form during baking, ruining the lovely presentation.
-
Utilize a Water Bath: Baking your cheesecake in a water bath helps maintain moisture and temperature consistency, preventing cracks and ensuring a creamy texture.
-
Gradual Cooling: Allow your cheesecake to cool gradually in the pan before refrigerating. Rapid temperature changes can lead to cracks and affect the overall texture.
What to Serve with Creamy Birthday Cheesecake
The delightful flavors and smooth textures of this cheesecake create the perfect opportunity to build a complete dessert experience.
-
Fresh Berries: A medley of strawberries, blueberries, and raspberries brings a burst of sweetness and a refreshing contrast to the rich cheesecake.
-
Chocolate Sauce: Drizzling warm chocolate sauce over slices adds a decadent touch, beautifully complementing the creamy and tangy flavors.
-
Vanilla Ice Cream: The cold creaminess of vanilla ice cream melds perfectly with the cheesecake’s rich & creamy texture, making each bite a dreamy indulgence.
-
Honey Drizzle: A light drizzle of honey adds an extra layer of sweetness and a floral note, enhancing the overall flavor profile of your dessert.
-
Crushed Nuts: Sprinkle some toasted almonds or pecans on top for a satisfying crunch and nutty flavor that pairs beautifully with the smoothness of the cheesecake.
-
Savory Cheese Platter: Balance the sweetness with a cheese board featuring aged cheeses, crackers, and cured meats for an unexpected but delightful contrast to the dessert.
-
Coffee or Espresso: A steaming cup of coffee or a shot of espresso enhances the cheesecake’s rich flavors, making for a satisfying end to your meal.
These pairings create a beautifully rounded out dessert experience, ensuring that your Creamy Birthday Cheesecake is the star of the show!
Creamy Birthday Cheesecake Recipe FAQs
What type of graham cracker crumbs should I use?
Absolutely! For a classic flavor, traditional graham cracker crumbs work perfectly. If you’re looking for a unique twist, crushed cookies like Oreos or digestive biscuits can add a special touch to your crust.
How should I store leftovers of this cheesecake?
To maintain the delightful flavor and texture, store any leftover cheesecake in an airtight container in the fridge for up to 3 days. Make sure to cover it securely to prevent it from absorbing any other odors.
Can I freeze the creamy birthday cheesecake?
Very! To freeze, I recommend slicing the cheesecake first. Wrap each slice tightly in plastic wrap and place them in a freezer-safe container. It’ll keep well for up to 1 month. When you’re ready to enjoy, simply transfer the slices to the fridge for 4-6 hours to thaw.
What if my cheesecake cracks while baking?
Don’t fret! This can happen if the batter is over-mixed or the oven is too hot. To prevent cracks, be sure to beat your eggs in at a low speed and avoid overmixing. Also, using a water bath during baking can keep your cheesecake moist, which is key for that rich & creamy texture!
Is this cheesecake suitable for people with allergies?
Certainly! The recipe is highly adaptable. For gluten-free needs, swap the graham crackers with gluten-free alternatives. If you’re catering to dairy allergies, you can use dairy-free cream cheese and sour cream. Always check labels for allergens, and feel free to consult with your guests for their specific dietary requirements.
Can pets enjoy cheesecake?
It’s best to keep this cheesecake away from pets! Ingredients like sugar and chocolate aren’t suitable for animals, and rich dairy products can upset their stomachs. Stick to pet-friendly treats for your furry friends!
Decadent Rich & Creamy Cheesecake for Every Celebration
Ingredients
Equipment
Method
- Preheat your oven to 350°F (175°C).
- In a mixing bowl, combine the graham cracker crumbs, granulated sugar, and melted unsalted butter until well blended. Press firmly into the bottom of a 9-inch springform pan.
- Wrap heavy-duty aluminum foil around the outside of the springform pan.
- Beat the softened cream cheese on medium speed until creamy. Gradually add granulated sugar and mix well.
- Lower the speed and mix in the sour cream and vanilla extract. Add eggs one at a time, mixing on low speed until blended.
- Gently fold in the rainbow jimmies into your mixture.
- Pour the cheesecake filling into the prepared crust. Place in a larger roasting pan and add hot water around it until halfway up the sides of the springform. Bake for about 60–70 minutes or until edges are set.
- Remove the cheesecake and water bath. Let cool on a wire rack for about an hour, then refrigerate for several hours or overnight.
- When ready to serve, remove from springform pan, top with whipped cream and additional rainbow jimmies.
Leave a Reply